Flare-on challenge 12
Please read the disclaimer
Now for the final test of your focus and dedication.
We found a floppy disk that was given to spies to transmit secret messages.
he spies were also given the password, we don't have that information,
but see if you can figure out the message anyway.
You are saving lives.
Note: I’m sorry the writeup is a bit messy, I couldn’t find the time to write it properly, if you have any question please contact me, have fun :D I will update it whenever I find some free time.
Overview
We are provided with a 16bit DOS bootable system, it prints some messages then asks for a password, deeper withing the system, 2 virtual machines are implemented, the first is implemented with subleqs which role is to emulate the second VM, and the other one is implemented with RSSB.
Setting up the environnement
I used BOCHS with IDA to run and debug the DOS system, to do that, you have to open IDA and choose BOCHS as debugger, then open this configuration file:
megs: 16

# hard disk
# ata0: enabled=1, ioaddr1=0x1f0, ioaddr2=0x3f0, irq=14

# floppy
floppya: type=1_44, 1_44="suspicious_floppy_v1.0.img", status=inserted

# what disk images will be used:

clock: sync=none

boot: floppy
panic: action=fatal
error: action=report
info: action=report
debug: action=ignore
Reversing the DOS system part
The files of the system:
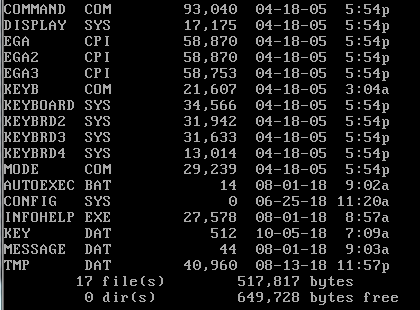
I first noticed some helpful stuff, as you can see in this screenshot, key.data contains the previous input
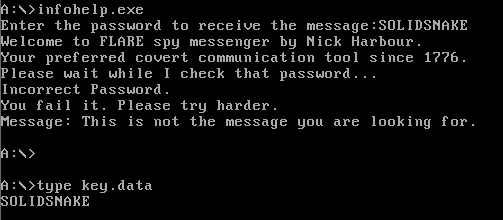
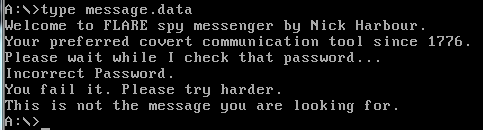
Also when reading message.data the same program that checks the password gets executed, this can hint that a certain syscall is hooked
cool, now to the real stuff, let’s use our debugger !
First we need to put a breakpoint in 0x7c00, and start exploring the assembly code, briefly those are the most important part to know
- Reads input from STDIN
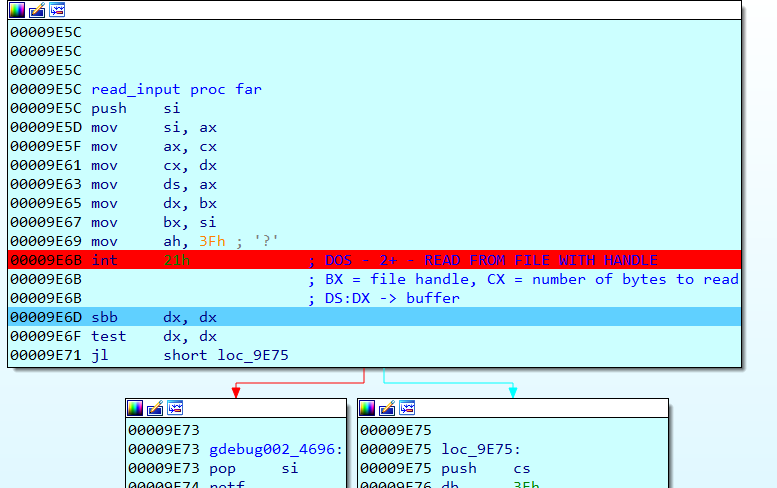
- Open key.data and write input to it
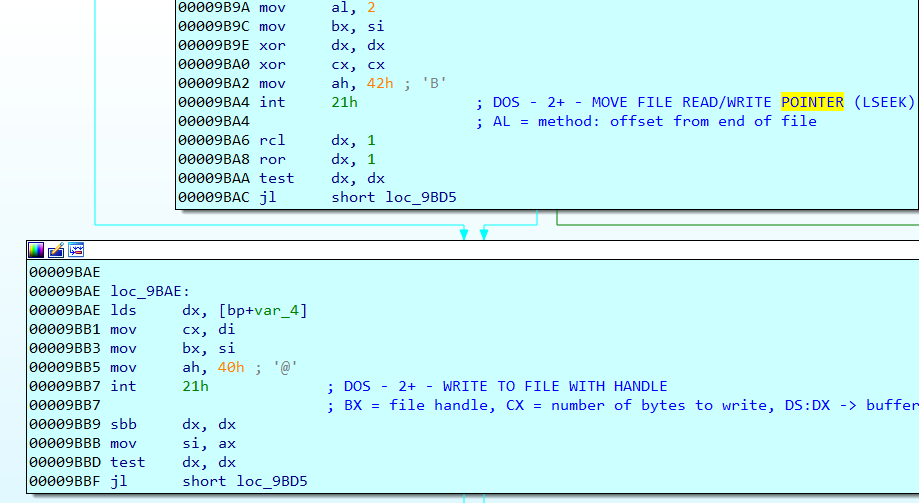
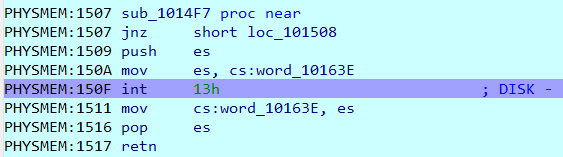
- Open message.data and read from it, this is where the syscall is triggered, following the assembly code I ended up to a INT 13h, executing this interruption will read TMP.data and start executing its code.
After some assembly instructions, I noticed that it copies input to a certain memory with unicode format

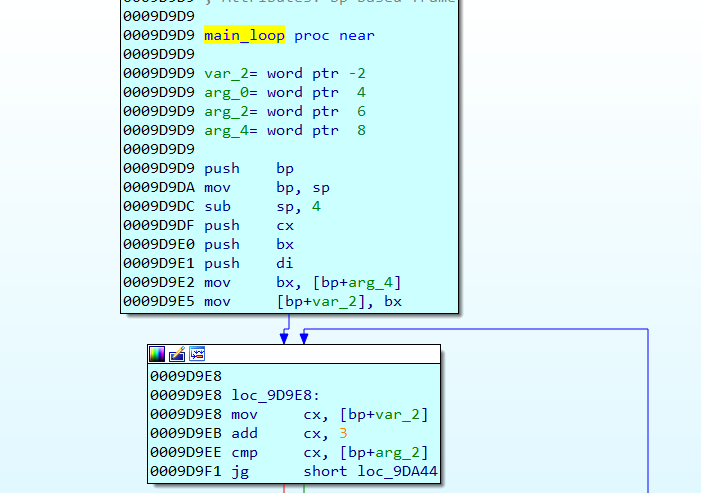
Then the code enter to a loop which is the main engine of the subleq virtual machine located at 0x9d9d9
overview of the engine:
in each iteration of the engine a certain function located at 0x9d99d is called
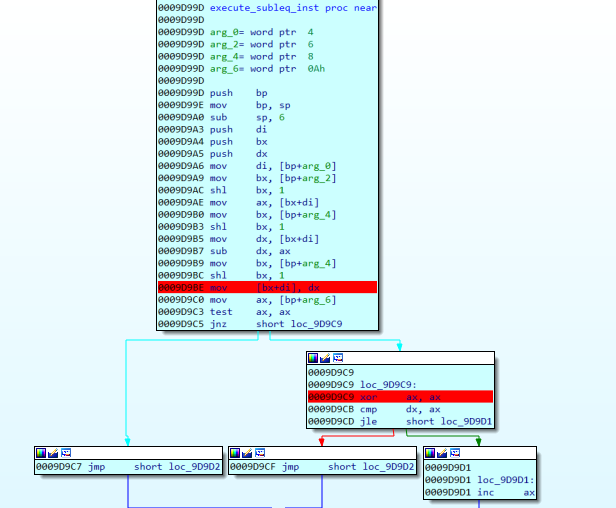
From the assembly code we can deduce that this is subleq VM.
To get a better control of the execution flow, I ported the assembly code to C code you can find the emulator in my github subleq emulator
Running the C program generates 150 millions subleq instructions, for this type of situation we can trace the instruction pointer of the virtual machine and draw a graph out of it

Looking at the graph and with some past experience, we can suppose that subleq is actually emulating another virtual machine, let’s see the graph in more detail
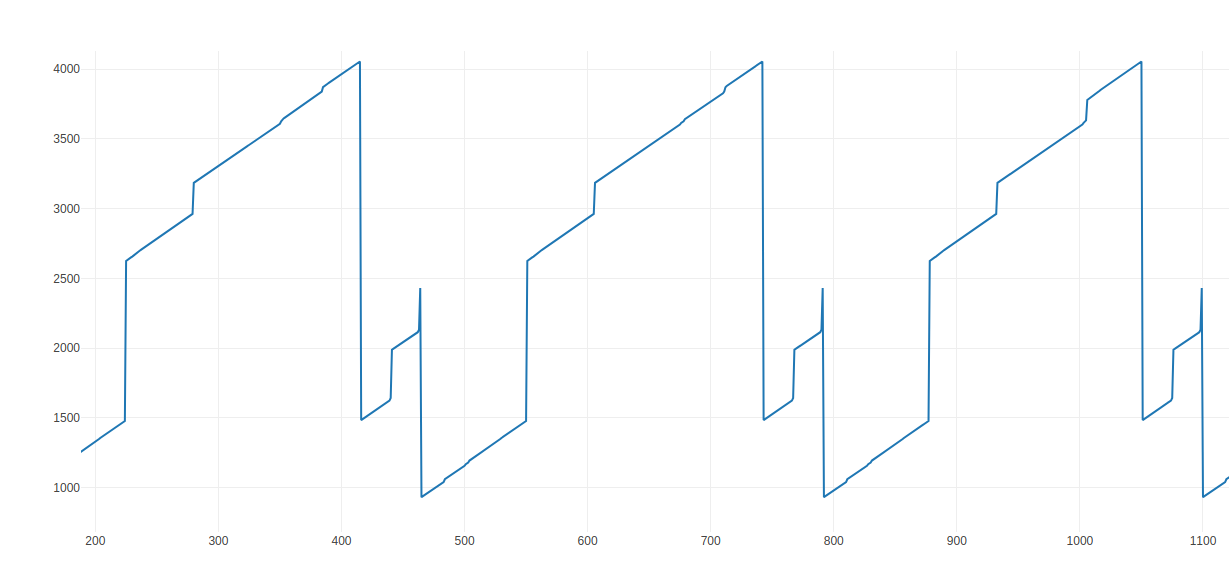
As you can see the graph is constant, it always jump to the same addresses, our next goal is to figure our 2 things
- The base address of the second virtual machine
- The type of the second virtual machine
Before that, I had the idea of writing some higher level instructions out of the subleq instructions subleq emulator higher instructions
looking through the subleqs translated to a higher level language and with the help of the graph, we can notice an interesting part
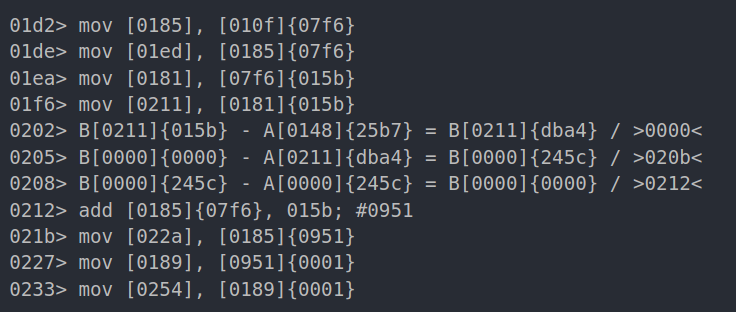
first iteration
second iteration:
third iteration:
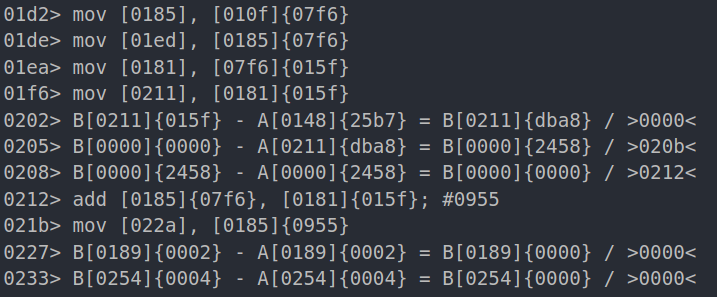
We can assume that the address [010f] contains the base address of the second vm which is {07f6}, looking a bit deeper we can notice other stuff like:
- A pointer at
[07f6], which is actually the offset pointer - A value
{25b7}is compared to that pointer - Data been copied from [base_address + offset_pointer] to [0254] for example, the first iteration it copies data from 0x951 the second one copies from 0x952
Knowing that, we can focus on first the iterations to determine the type of the second VM.
First I compared the differences between each iteration to help me understand the flow. After that I enumerated everything that is happening in a single iteration then concluded that the second VM is actually using RSSB
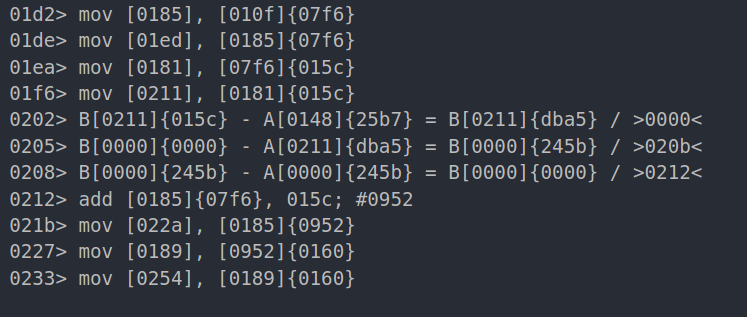
to explain this with more details, I will take the second iteration as an example:
as you can see here, it does the following:
- Calculates the vm pointer by summing base address + offset pointer
- Mov the vm data(0160) pointed by the vm pointer to 0x0254

- Calculates another vm address(0956) by adding base address(07f6) + vm_data(0160) found earlier
- Mov data(0002) pointed by 0956 to 07ee

- Subtract that data(0002) from the content of 07ee
- Mov the result to 07ee

This is enough to suppose that the second vm is using RSSB
Next, I dumped the data starting from the base address of the second vm (07f6), and wrote a RSSB emulator to check either my supposition was correct or not, fortunately it was ! Here is my C code to emulate it rssb emulator
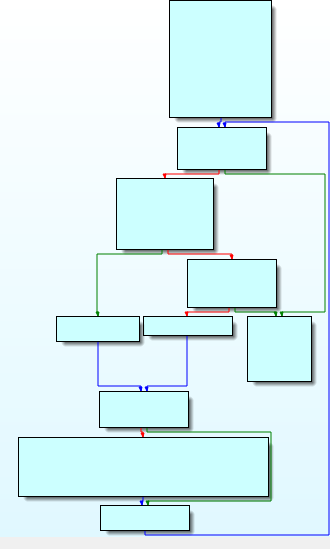
Our next goal is to figure out how the input is checked, but first an overview about what is happening is crucial so I made another graph
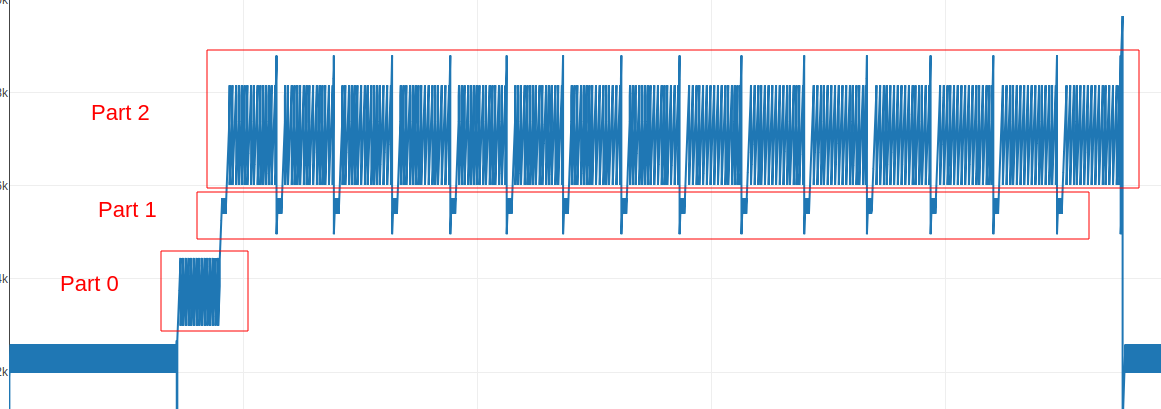
With this we can divided our research in 3 parts according to the graph, each part is a loop with multiple iterations
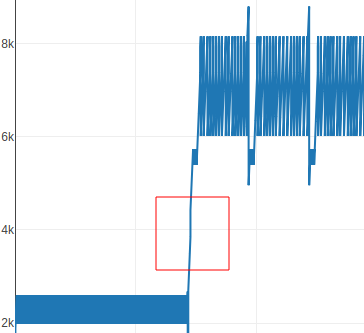
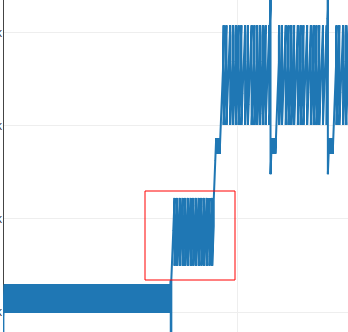
PART 0
By fuzzing with different input, I noticed something interesting, for example if you put @ at the beginning of your input the PART 0 executes less instructions compared if you put @ at the end of your input.
Checking the RSSB instructions reveals that the supposition was correct to summarize it, it go through the input and check if @ is present, if it does, it jumps to PART1
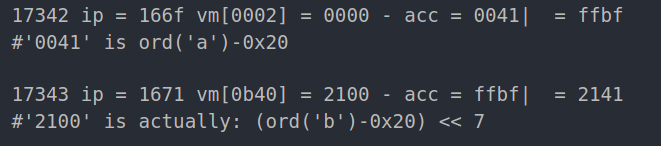
Here we can see that it subs my first character which was ‘a’ (0x61 in hex) from ’@’ (0x40 in hex)

PART 1
This part is always present before PART 2, after reading its instructions I was able to come up with this expression: input[i]-0x20 + ((input[i+1]-0x20) << 7)
in each iteration i is incremented by 2, knowing that we have 15 of those iterations, we suppose that the password length is 30
PART 2
This part is constant even with different input, it get executed only when @ is present in the input, we can see 15 iterations of the same loop, so I assumed this is the part that checks the password
Digging deeper by reading the instructions and by arming my self with a lot of patience, I was able to understand the flow of the check, it performs sequentially the following operations:
- Xor the value calculated earlier:
input[i]-0x20 + ((input[i+1]-0x20) << 7)with iteration number of PART2 multiplied by 33 - Calculate the sum of the input characters then add to it a value dependent of number of chars before ‘@’

- Add the 2 values calculated

- Compare result with a hardcoded hash

A pseudo code for PART1 and PART2 would be:
1
2
3
4
5
6
7
8
9
10
11
12
13
14
15
correct = 1
iteration = 0
for i in range(0, len(password))-2, 2):
    A = (password[i] + (password[i+1]<<7)) ^ (iteration*33)
    B = sum_chars(password) + variable_dependent_of_length
    if A + B == hardcoded_hash:
        correct *= 1
    else:
        correct *= 0
    iteration += 1

if correct == 1:
    print 'success'
else:
    print 'error'
After extracting the 15 hashes, the goal is to bruteforce the characters 2 by 2, the only problem is that we don’t have the sum of the password characters, so I supposed that the password ends with @flare-on.com we can use for example om to retrieve the sum, and then bruteforce the remaining characters:
1
2
3
4
5
6
7
8
9
10
11
12
13
14
15
16
17
18
19
20
21
22
23
24
25
26
27
28
29
30
31
32
33
import string
import itertools
from pwn import *

post_flag = '@flare-on.com'
flag_len = 30
summ = 0
length_var = 0x8400

hashes = [0xfc7f, 0xf30f, 0xf361, 0xf151,0xf886,0xf3d1,0xdb57,0xd9d5,0xe26e,0xf8cd,0xf969,0xd90c,0xf821,0xf181,0xf85f]

def pre_calc(a, b):
	return ((ord(a) - 0x20) + ((ord(b) - 0x20) << 7)&0xffff)

def get_sum(a):
	s = 0
	for i in a:
		s += ord(i)

A = pre_calc('o', 'm')^(33*14)
summ = hashes[14] - length_var - A

flag = ''

for i in xrange(flag_len/2):
	for combo in itertools.product(string.printable, repeat=2):
		A = pre_calc(combo[0], combo[1])^(33*i)
		B = summ + length_var

		if A + B == hashes[i]:
			flag += combo[0] + combo[1]

log.success('flag=> %s',flag)

If you liked my writeup, please take a look at my github repo